Contents
|
||||||||||||||

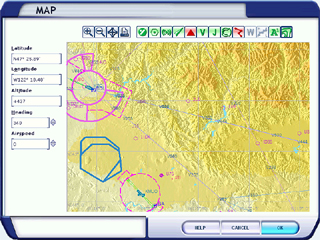
The Map dialog box provides you with a graphical representation of your route, information about airports and facilities along the way, and the ability to instantly change your position, altitude, heading, and airspeed. The Map dialog box also lets you change the point of view of the tower so that you can watch your aircraft from a specific position and altitude when you choose Tower mode.

The Map dialog box lets you display or hide graphical elements in the map itself. For example, if you want to see the locations of all of the airports in the Flight Simulator world, you can display them on the map. Doing so, however, may make the map too cluttered, so the Map dialog box also lets you hide the airports.
To open the Map
|
|
Related Links
|
||||||||||
Map offers two modes: Select Aircraft mode to change the location, altitude, heading, and airspeed of your aircraft, or select Tower mode to change the location and altitude of the tower.
Using the Map
Think of the map as an aviation chart. Just like real-world charts, the Flight Simulator map displays airports, navigational aid facilities, airways, flight paths, and other relevant data. The map can also display topographical information, an especially useful feature when flying in mountainous areas, as well as things a real-world navigation chart cannot, like weather fronts (when using Real-World Weather).
The map displays your aircraft as a small plane icon, and the tower as a small tower icon. You can zoom in and out to display more detail or more territory on the map.
Moving the Map
The map always displays north at the top. You can move the map in any direction to view another part of your route by clicking near the edge of the map; you'll find this option particularly helpful when you zoom in to get a closer view of the map.
For example: To view a portion of the map south of the area currently displayed, place the pointer near the bottom edge of the map. When the pointer turns into a large arrow, click the edge of the map; the area of the map's view will move down. To move the map east, click the right side of the map; to move west, click the left side of the map; to move north, click the top of the map. You can also move diagonally by clicking a corner of the map.
The map also displays state and country borders, as well as latitude and longitude lines. Use the icons at the top of the map to display features such as navigational aids, airports, weather stations, airspace boundaries, and airways.
Displaying or Hiding Map Elements
Use the icons along the top of the Map dialog box to navigate within the map or to display or hide map elements. The table below explains the function of each icon.
| Icon | Function |
| Zoom in | |
| Zoom out | |
| Center map on your aircraft's current position. | |
| Print the current map. | |
| Display or hide airports. | |
| Display or hide VORs. (To learn more, see What You Need to Know About a VOR.) | |
| Display or hide NDBs. (To learn more, see Automatic Direction Finder.) | |
| Display or hide ILS feathers. (To learn more, see the Instrument Lessons in the Flight Academy.) | |
| Display or hide airway intersections. | |
| Display or hide low altitude airways. | |
| Display or hide high altitude airways. | |
| Display or hide airspace boundaries. (To learn more, see Understanding Airspace.) | |
| Display or hide your aircraft's flight path. | |
| Display or hide weather stations. | |
| Display or hide weather systems. (To learn more, see Weather.) | |
| Display or hide data tags. | |
| Display or hide topographic features. |
Data Tags
Flight Simulator displays a data tag next to individual map elements, which makes it easy to get information quickly. Data tags include airport information (airport name, runway length and altitude, radio frequencies, and the like), airspace information, instrument approach information, and navigational aid information.
To display or hide data tag information
|
Using the Map in Aircraft Mode
Rather than flying to a location where you want to begin a flight, you can move your aircraft on the map. (You can also move your aircraft using the Go to Airport dialog box, but using the map allows you to quickly place your aircraft anywhere, including in off-airport locations.) Move your aircraft on the map by using the text boxes on the left side of the Map dialog box, or by dragging your aircraft to the desired location.
To select Aircraft mode
|
Dragging the aircraft
To move your aircraft by dragging
|
Changing Aircraft Latitude
To change your aircraft's latitude
|
Changing Aircraft Longitude
To change your aircraft's longitude
|
Changing Aircraft Altitude
To change your aircraft's altitude
|
Changing Aircraft Heading
To change your aircraft's heading
|
Changing Aircraft Airspeed
To change your aircraft's airspeed
Note: You can exceed your aircraft's maximum speed, but Flight Simulator will display an overspeed warning during flight. |
Using the Map in Tower Mode
Changing the tower position in the Map dialog box does not change the position of the control tower buildings in Flight Simulator; rather, it changes the point of view that you see when you choose Tower View. Using this feature lets you observe your aircraft in flight from a fixed position outside of the aircraft. For example, you can set the tower view at 3,000 feet and watch yourself flying aerobatics in the Extra 300S; you could also place the tower in the middle of a large lake and watch yourself make landings in the Cessna Caravan C208 Amphibian.
Move the tower using the text boxes on the left side of the Map dialog box, or by dragging the tower to the desired location.
To select Tower mode
|
Dragging the Tower
To move the tower by dragging
|
Changing Tower Latitude
To change the tower's latitude
|
Changing Tower Longitude
To change the tower's longitude
|
Changing Tower Altitude
To change the tower's altitude
|
Remember: Because you'll set tower altitude in feet or meters above sea level, you must take into account the altitude of the land in the area you are placing the tower. For example, if you set the tower view at Meigs Field in Chicago to 1,000 feet, the view will be only 407 feet above ground level because Meigs Field's elevation is 593 feet MSL.
Getting Information about Airports and Facilities
You can get information about any airport, airspace, or facility depicted on the map in the Map dialog box. The information is displayed in ToolTips, bubbles that appear when you pause the pointer over map elements. You may have to enlarge the map or hide some map elements to see other elements.
To see ToolTip information on the map
|
The following table lists the information found in map ToolTips.
| Map element | Information in ToolTip |
| Airport | Airport name, ICAO ID, runway, elevation, radio frequencies. |
| VOR | VOR name, ID, class, frequency. |
| NDB | VOR name, ID, class, frequency. |
| Marker beacon | Outer, middle, inner label. |
| ILS feather | ILS name, ID, final approach heading, frequency. |
| Intersections | Intersection name |
| Low altitude (victor) airways | Airway designator and minimum en route altitude. |
| High altitude (jet) airways | Airway designator and minimum en route altitude. |
| Airspace boundary | Airspace name, class, altitude limits. |
| Weather stations | Station name, temperature/dewpoint, wind direction and speed. |