Contents
|
||||||||||

The Flight Planner helps you plan VFR and IFR routes. It's not necessary to have the navigation charts for your route (although it can help and adds realism). The Flight Planner determines your routing based on the type of flight you want to make, suggests a cruising altitude, provides navigation aid frequencies for your route, provides estimated times between waypoints, and keeps track of all these items in the Navigation Log.
The Global Positioning System (GPS) also displays the route in the cockpit, including the next waypoint on the route, along with distance and bearing to that waypoint. (For more information, see Using the GPS.)
Note: Creating an IFR flight plan and clicking the OK button on the Flight Planner Edit tab in Flight Simulator is equivalent to filling out a flight plan form at the airport and handing it to the flight service representative in the real world. Your flight plan is not active until you call ATC on the radio and ask for clearance.
You can activate an IFR flight plan from your current location, even during flight. You can also activate a previously created flight plan in the air. In theory you can create a flight plan from Jerusalem to Damascus, take off from Cairo, and then activate the flight plan when you get near Jerusalem. In this scenario, a message box will appear asking whether you want to move your airplane to the airport indicated as the departure airport on the flight plan form. If you choose not to move the airplane, you will be cleared from your current location to your destination.
To access the Flight Planner
|
|
Related Links
|
||||||||||
Creating a Flight Plan
On the Create tab of the Flight Planner, make selections for the type of flight, the departure and destination points of the flight, and the type of routing you desire.
Think of the Create tab as a five-step operation:
- Choose the departure location.
- Choose the destination.
- Choose the flight plan type.
- Choose the routing method.
- Find the Route.

1. Choose the Departure Location
To enable the Flight Planner to automatically determine the route for your flight, you must define your departure location. For more information, see Using the Go to Airport Dialog Box.
Note: Flight Simulator supports filing an IFR plan during a flight. When you create a flight plan, you can choose to start the IFR flight at your current location.
To select a departing location
|
2. Choose the Destination Airport
To enable the Flight Planner to automatically determine the route for your flight, you must tell it where you are going. For more information, see Using the Go to Airport Dialog Box.
To select a destination airport
|
3. Choose the Flight Plan Type
On the Create tab, you can select the type of flight plan you intend to fly. The choice you make will be a factor in the altitude the Flight Planner chooses for your flight.
To choose a flight plan type
|
4. Choose the Autorouting Method
You have a choice of methods that the Flight Planner can use to plot your route. These selections are unavailable until you have chosen departure and destination airports.
To choose a routing
|
5. Find the Route
Once you have completed the first four steps of planning your flight, click Find Route in the Plot Flight Plan box; the Flight Planner will flip to the Edit tab. You will see the Map with your route drawn as a red line across the display. You can now make adjustments and refinements to your flight plan.
To complete the flight plan
|
Editing a Flight Plan
On the Edit tab of the Flight Planner, you can view your flight's route, make choices about how much information to display on the route map, and edit the route and cruising altitude.
Note: Be aware that the cruising altitude chosen for IFR flight plans will be used as the clearance altitude by ATC. The controller will clear you to that cruising altitude. You can, however, change the altitude in the Flight Planner or request altitude changes in flight.

Using the Route Map
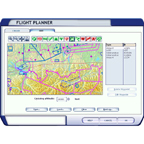
After you create a flight plan, the map on the Edit tab of the Flight Planner displays the route graphically as a red line. (For more information, see Creating a Flight Plan.) The red line indicates the route that you will follow, but you can add or delete waypoints along this route to customize it.
The map always displays north at the top. You can move the map in any direction in order to view another part of your route.
To move the map
|
The map displays airport information, airspace boundaries, geographical borders, and latitude and longitude. You can also choose to display other features, such as navigational aids, airports, and airways. Learn what each of the icons at the top of the map represents, and use the icons to display only what you need in order to keep the map easy to read.
To display or hide individual map elements
|
See the Map Display Icons section below to learn the icon functions.
Changing the Cruising Altitude
The altitude in a flight plan in Flight Simulator is determined automatically by whether you selected VFR or IFR on the Create tab. When you choose VFR, the altitude selected is what is required to safely clear terrain along your route. When you chose an IFR flight plan, the altitude selected is at or above the minimum en route altitude (MEA) requirements. Remember that you can request a new altitude from ATC in flight when flying IFR.
To change your cruising altitude
|
Map Display Icons
A set of 17 icons at the top of the map lets you customize the map display. When you move the pointer over an icon, rollover help describing the icon's function appears at the bottom of the Flight Planner screen.
| Button | Function | How to use |
| Zoom In | Click to zoom in on the map, so you can see more detail. | |
| Zoom Out | Click to zoom out on the map, so you can view a larger area. | |
| Reset Zoom | Click to reset the map to the default magnification. | |
| Click to print the currently displayed section of the map. Only the section displayed on screen will be printed. | ||
| Airports | Click to display airports on the map. | |
| VORs | Click to display all VOR stations. VORs are displayed in blue. | |
| NDBs | Click to display all nondirectional beacon (NDB) stations. NDBs are displayed as red concentric circles. | |
| ILS | Click to display ILS feathers. | |
| Intersections | Click to display all airway intersections. Intersections are displayed as green triangles. | |
| Victor Airways | Click to display all Victor airways. Victor airways are displayed as blue lines. | |
| Jet Airways | Click to display all Jet airways. Jet airways are displayed as magenta lines. | |
| Airspace | Click to display airspace boundaries. You may need to zoom in to see the boundaries. | |
| Route Line | Click to display the route line. | |
| Weather stations | Click to display all weather stations. | |
| Weather systems | Click to display weather systems when real-world weather has been downloaded. To learn more, see Using Real-World Weather. | |
| Data Tags | Click to display labels next to objects on the map. | |
| Contour Map | Click to display terrain contours on the map. |
The Waypoint List
The waypoint list is on the right side of the Flight Planner Edit tab. The Type column shows the type of waypoint: WP (a custom waypoint), VOR, NDB, intersection, or airport. The ID column shows the ICAO (International Civil Aviation Organization) identifier for waypoint that have identifiers. Custom waypoints are labeled WP1, WP2, etc.
If you click any waypoint in the list, the map will zoom in on that waypoint. You can return to the default magnification by clicking the Reset Zoom icon.
Adding Waypoints
You can create waypoints using navigation facilities, navaid intersections, or airports. You can even add waypoints at arbitrary points in space using the Flight Planner.
To add waypoints to a route
|
To edit custom waypoints
|
To delete a waypoint
Note: You cannot delete the departure or destination airports from the waypoints list. |
Saving, Loading and Clearing a Flight Plan
Once you've created a flight plan, you can save it for reuse. If you load a saved flight plan and make modifications to it, Flight Simulator will prompt you to save the file again. If you save the flight plan and click Yes to overwrite the previous file, the Navigation Log and Flight Planner map display will reflect your changes.
To save a flight plan
|
To load a saved flight plan
|
To clear the current flight plan:
|
The Navigation Log
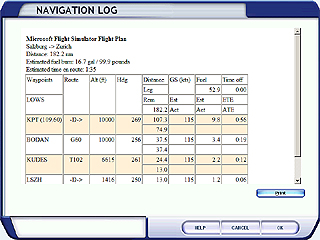
The navigation log lists the waypoints and time en route for your flight, as well as headings, speeds, and fuel burn rate along the route. The portion of flight from one waypoint to another is referred to as a "leg."
|
To access the navigation log:
|

Navigation Log Header
The navigation log header lists your flight's departure and destination airports, the total distance between them, the estimated fuel required to complete the trip, and the estimated time en route.
Waypoints
The waypoints listed from top to bottom in the first column of the navlog follow the order that your flight will pass over them. The ICAO identifier is used as the waypoint name. If the waypoint is a radio navigation facility, its frequency is listed in parentheses next to the identifier.
Route
The route listing depends on what type of routing you chose when creating the flight plan. Flight plans routed via GPS or VOR to VOR will always show the -D-> symbol, indicating that the route is direct from one waypoint to the next. Flight plans routed via airways will indicate the airway designation (e.g., J50 or V122) on which each leg of the flight is flown.
Alt
The Alt column displays the cruising altitude in feet or meters, depending on your international settings. (For more information, see International Options.)
Hdg
The Hdg column displays the heading to the waypoint.
Distance
The distance shown in the top row indicates the distance of the entire flight. Each row in the Distance column is split into two cells: The top cell indicates the distance of the leg, or the distance from the current waypoint to the next waypoint; the bottom cell indicates the distance remaining to the final destination.
GS (Kts)
Each row in the GS (or ground speed) column is split into two cells: The top cell indicates the estimated ground speed, which is based on the speed of the aircraft selected when the flight plan was created; the bottom cell indicates the actual ground speed, which is calculated and updated during the flight.
Fuel
The top of the Fuel column indicates the total fuel on board the aircraft. Each row in the Fuel column is split into two cells: The top cell indicates the estimated fuel burn for that leg, and the bottom column indicates the actual fuel burn, which is calculated and updated during the flight.
Time
The top value in the Time column indicates time of departure. Each row in the Time column is split into two cells: The top cell indicates the estimated time to the waypoint, and the bottom cell indicates the actual time to the waypoint, which is calculated and updated during the flight.
To print the Navigation Log
|